LVS 구성_CentOS 7
(pacemaker + ldirectord)
Pacemaker 란 ?
| Cluster 관리를 위해 근래 apache storm, openstack 등에 사용하는 분산 코디네이터 |
Corosync 란 ?
| 클러스터 내의 노드 간 Discovery, 통신, 동기화 작업 등을 담당 |
1. 사전 준비
| * 서버 3대 (LVS master, LVS stantby, web 서버) * ip 할당 VIP : xxx.xxx.xxx.70 LVSM : xxx.xxx.xxx.78 LVSS : xxx.xxx.xxx.117 WEB1 : xxx.xxx.xxx.121 * 방화벽 허용(master / slave 동일) 호스트 간 통신에 필요한 포트 TCP : 2224, 3121, 21064 UDP : 5405 - TCP 2224 : 클러스터의 노드 간 통신 시 필요 - TCP 3121 : 클러스터에 Pacemaker 원격 노드가 있는 경우 모든 노드에 필요 - TCP 21064 : 클러스터에 DLM 이 필요한 리소스가 포함된 경우에 필요 - UDP 5404 : corosync 노드에 필요 |
Hostname 설정 (master / slave 동일)
| xxx.xxx.xxx.78 lvsm xxx.xxx.xxx.117 lvss xxx.xxx.xxx.121 www.hwlee.shop |
Master 서버 설정
1. cluster package 설치 / pcs 데몬 시작 (master/slave 동일)
| # yum install -y pacemaker corosync pcs psmisc policycoreutils-python # systemctl enable pcsd # systemctl enable corosync # systemctl enable pacemaker # systemctl start pcsd |
2. 클러스터 계정 설정 (master / slave 동일)
| #passwd hacluster |
3. 각 노드에 대한 hacluster 사용자 인증(master)
| # pcs cluster auth lvsm lvss Username: hacluster Password: lvss: Authorized lvsm: Authorized |
4. 클러스터 생성/실행 (master)
| #pcs cluster setup --name auth_cluster lvsm lvss (명령을 통해 corosync를 구성하고 다른 노드와 동기화) #pcs cluster start –all (클러스터 실행) |
5. STONITH 비활성화 (master)
| # pcs property set stonith-enabled=false # pcs property set no-quorum-policy=ignore |
- STONITH는 서비스가 중복으로 실행되어 충돌 나는 것을 방지하기 위해 오류가 발생한 호스트를 죽이는 Fencing 기능
- cluster를 실행하면 데이터의 무결성을 확보하기 위해 기본으로 STONITH가 활성화 되어 있음 (활성화 -> 비활성화)
- no-quorum-policy: 클러스터에 quorum이 없을 때의 수행 작업을 설정
※ quorum 이란 ?
분산 시스템에서 작업을 수행하기 위해 분산 트랜잭션이 획득해야 하는 최소 투표 수로 노드가 2개인 클러스터에는 불필요하기 때문에 no-quorum-policy=ignore 설정으로 무시하도록 설정
6. Active/Passive 클러스터 설정 - 가상IP 생성 (master)
| #pcs resource create VirtualIP ocf:heartbeat:IPaddr2 ip=xxx.xxx.xxx.70 cidr_netmask=32 op monitor interval=30s #pcs resource enable VirtualIP  |
7. ldirectord 설치(master / slave 동일)
| # rpm -ivh https://ko.osdn.net/projects/linux-ha/downloads/71663/pacemaker-repo-1.1.21-1.1.el7.x86_64.rpm # yum -y install ldirectord # yum erase -y pacemaker-repo |
8. ocf:heartbeat resource 추가(master / slave 동일)
9. sysctl.conf 설정
| # vi /etc/sysctl.conf -------------------------- net.ipv4.ip_forward = 1 -------------------------- → 패킷 포워딩 # sysctl -p |
10. ldirectord 설정
| #vi /etc/ha.d/ldirectord.cf ------------------------------------------- checktimeout=10 checkinterval=10 autoreload=no quiescent=no # Web Server LVS virtual = xxx.xxx.xxx.70:80 real=xxx.xxx.xxx.121:80 gate 10 service=http request="lvs" receive="auth" scheduler=wlc persistent=7200 protocol=tcp checkport=80 checktype=negotiate ------------------------------------------ |
11. web 서비스 resource 추가(master)
# pcs resource create WebService ocf:heartbeat:ldirectord op monitor interval="20" timeout="10" |
12. 리소스 통합(master)
- VIP 와 웹 리소스가 나누어져 있어 한쪽으로 통합
# pcs constraint colocation add WebService with VirtualIP INFINITY |
13. master 서버와 web 서버가 같은 네트워크 대역 대가 아니므로 라우팅 설정 추가(master)
| # route add -net xxx.xxx.xxx.112 netmask 255.255.255.240 dev eth0 |
14. 확인
 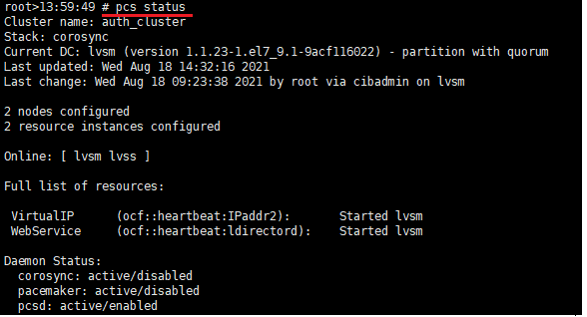 # ipvsadm -Lnc 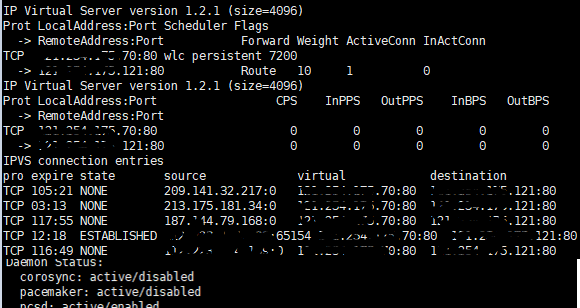 |
Slave 서버 설정
1. cluster package 설치 / pcs 데몬 시작 (master/slave 동일)
2. 클러스터 계정 설정 (master / slave 동일)
3. ldirectord 설치(master / slave 동일)
4. ocf:heartbeat resource 추가(master / slave 동일)
5. sysctl.conf 설정(master / slave 동일)
6. ldirectord 설정(master / slave 동일)
7. failover 테스트
| # pcs cluster stop lvsm (lvsm 노드 stop)  - lvss 로 넘어옴 #pcs cluster start lvsm  - lvsm 노드 start 하여도 lvsm 로 넘어오지 않음(failback) ※ auto_failback off 실 서버 lvsm 서버에 문제가 생겨 리소스가 강제로 lvss 로 넘어간 경우, lvsm 서버 상태가 완벽하게 확인이 되지 않은 상태로 다시 넘어오게 하지 않기 위해 failback 기능을 사용하지 않는다. |
※ constraint 란 ?
| Pacemaker 리소스를 선호하는 위치로 설정이 가능 #pcs constraint location WebService prefers lvsm=50 (lvsm 에 우선순위 50지정) 1) 설정 값 확인 # crm_simulate -sL 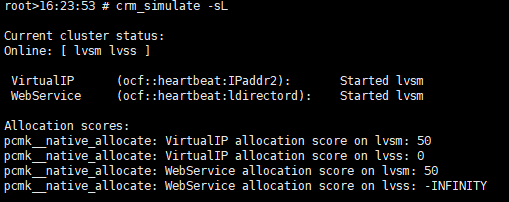 # pcs constraint show  #pcs cluster stop lvsm 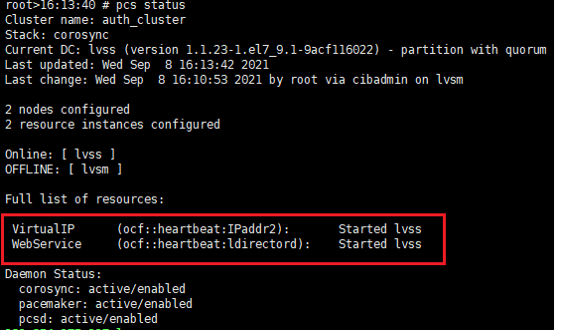 - lvs M stop 시 lvsm → lvss 로 넘어감 # pcs cluster start lvsm 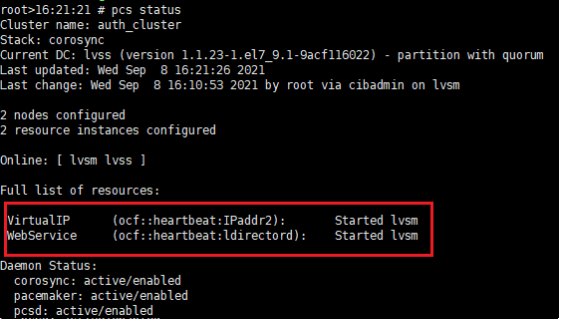 - lvs M start 시 lvss → lvsm 으로 넘어옴 |
8. 확인
- 웹 에서 vip 접근 시
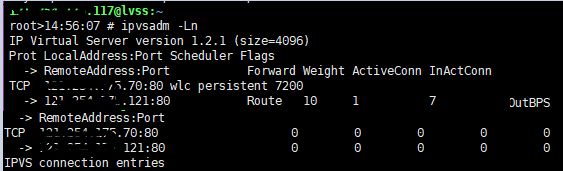 # ipvsadm -Lnc  |
Web 서버 설정
1. sysctl 설정
| # vi /etc/sysctl.conf -------------------------------------------------- - 패킷 포워딩 net.ipv4.ip_forward = 1 - 실 서버에 ARP 문제 해결을 위해 ARP에 대한 응답 없음 설정 추가 net.ipv4.conf.default.arp_ignore = 1 net.ipv4.conf.default.arp_announce = 2 net.ipv4.conf.all.arp_ignore = 1 net.ipv4.conf.all.arp_announce = 2 net.ipv4.conf.lo.arp_ignore = 1 net.ipv4.conf.lo.arp_announce = 2 net.ipv4.conf.eth0.arp_ignore = 1 net.ipv4.conf.eth0.arp_announce = 2 ----------------------------------------------------------------------------- # sysctl -p (설정 적용) |
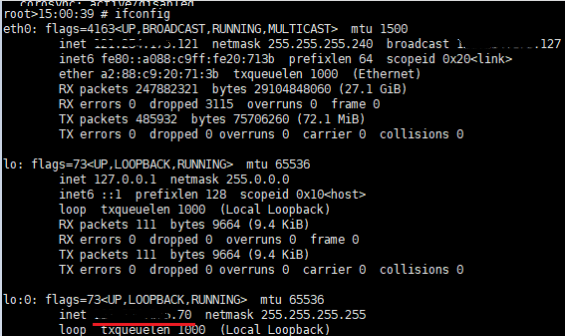
2. 리얼 서버(web)는 가상 IP(VIP)를 로컬 주소로 인식하도록 lo:0 설정
| # ifconfig lo:0 xxx.xxx.xxx.70 netmask 255.255.255.255 up |
3. vip 확인
 |